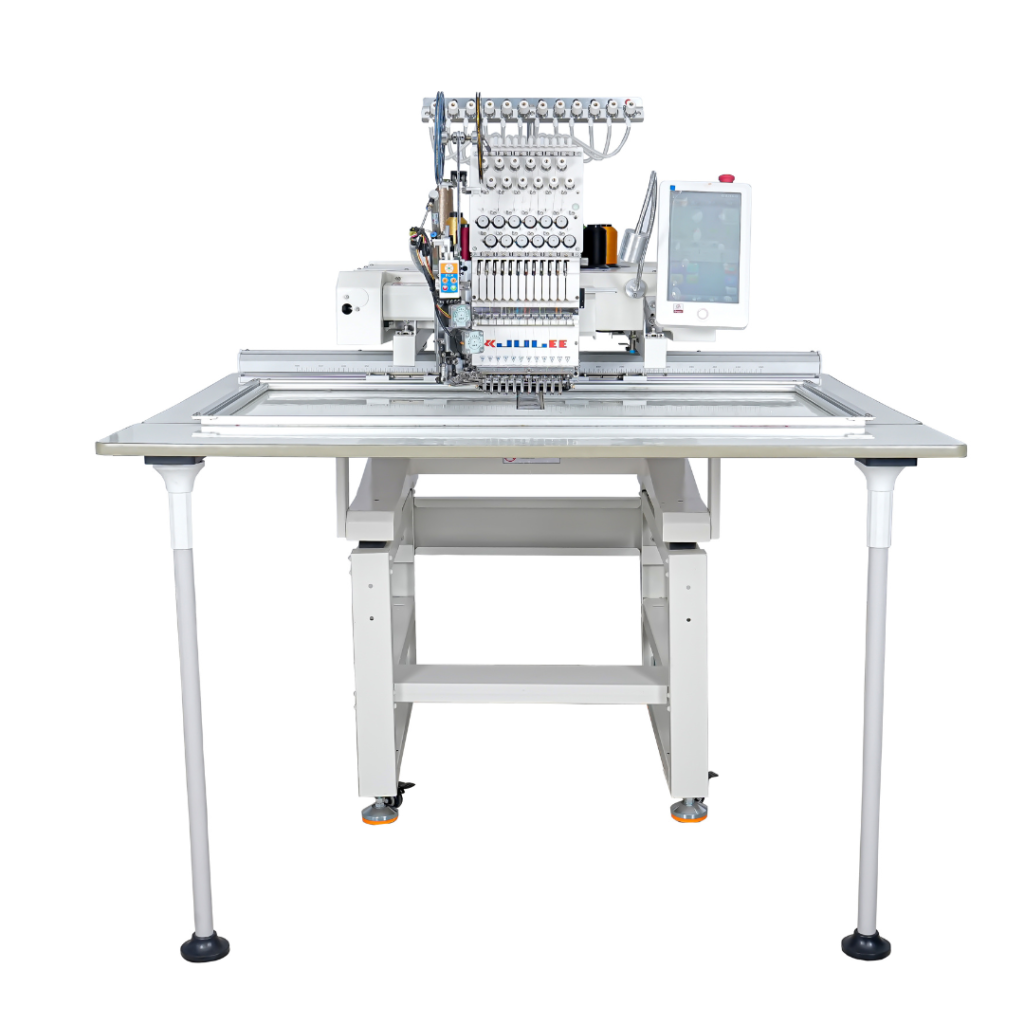
How to Integrate Embroidery Machines with E-Commerce Platforms (Shopify, Etsy, Amazon)

The embroidery business is no longer limited to local boutiques and walk-in customers. Today, more and more embroidery entrepreneurs are moving online, offering customized apparel, uniforms, and accessories through e-commerce platforms like Shopify, Etsy, and Amazon. With the right setup, your embroidery machines can be directly integrated into your online store, making order management smooth, reducing errors, and speeding up production.

In this guide, we’ll explore the step-by-step process of integrating embroidery machines with e-commerce platforms, the benefits of doing so, and the best tools and practices to ensure your embroidery business thrives online.

Why Integration Matters

Running an embroidery business without integration often means juggling orders from multiple platforms, manually re-entering customer details, and constantly switching between order management and production. This slows down workflow and increases mistakes.

When embroidery machines and e-commerce stores work together, you unlock:

  • Automation: Orders flow directly into your production queue.
  • Speed: No more delays between customer purchase and embroidery setup.
  • Accuracy: Reduce human error in digitizing and file transfers.
  • Scalability: Handle 10 orders or 1,000 with the same process.

Step-by-Step Integration Process

1. Choose the Right Platform

Not every platform is right for every embroidery business:

  • Shopify: Ideal for building your own branded store, complete with custom design options for customers.
  • Etsy: Best for embroidery shops targeting handmade, craft, or personalized product buyers.
  • Amazon: Perfect for large-scale embroidery businesses aiming for mass exposure and bulk sales.

2. Connect Your Store to Your Workflow

Most platforms allow integration through apps, plugins, or APIs. For example:

  • Shopify apps like Order Desk or Automizely can route orders into your production system.
  • Etsy offers integration via middleware that connects directly with embroidery management software.
  • Amazon sellers often use third-party ERP or MIS tools to handle bulk orders.

3. Sync with Embroidery Software

Once orders arrive in your system, you’ll need to link them to embroidery software such as Wilcom, Hatch, Pulse, or Tajima DG. These programs allow you to:

  • Convert order details (names, logos, designs) into stitch-ready files.
  • Automate design placement on specific product templates (caps, shirts, bags).
  • Save time with pre-digitized design libraries for repeat orders.

4. Send Jobs to Embroidery Machines

Most industrial embroidery machines accept file formats like DST, PES, EXP, JEF, or VP3. With integration, your digitized files can be automatically assigned to machines, either directly or through a production manager.

  • For multi-head machines, orders can be grouped for bulk production.
  • For custom, one-off orders, files can be queued individually.

Tools & Software to Make It Easier

Here are some tools that embroidery businesses use to bridge e-commerce and production:

  • Shopify Apps: Order Printer Pro, InkSoft, Printful alternatives (with embroidery support).
  • Embroidery-Specific ERPs: DecoNetwork, Hoopmade, EmbroideryWorks.
  • Digitizing Services: Cloud-based services that convert artwork into embroidery files and sync back to your workflow.
  • Automation Tools: Zapier or Integromat (Make) to connect e-commerce platforms with embroidery software.

Challenges & How to Solve Them

  1. Handling Personalization
    • Problem: Customers want unique names, initials, or logos.
    • Solution: Use product pages with text/image upload options that feed directly into your embroidery software.
  2. File Format Compatibility
    • Problem: Different embroidery machines require different file formats.
    • Solution: Set up your digitizing software to auto-export into multiple formats if needed.
  3. Bulk vs. Custom Orders
    • Problem: One-off personalized orders take more time than bulk runs.
    • Solution: Separate workflows—use batching for large runs and automation for small, custom jobs.
  4. Integration Costs
    • Problem: Some apps and ERPs can be expensive.
    • Solution: Start with affordable tools (like Order Desk or Zapier) before scaling into enterprise-level systems.

Best Practices for Success

  • Offer Customization at Checkout: Add fields for names, logos, or fonts directly on your e-commerce store.
  • Maintain a Design Library: Store frequently used digitized designs for faster turnaround.
  • Train Your Team: Staff should know how to handle order syncing, file checking, and machine setup.
  • Test with Small Batches: Before rolling out integration to your whole business, test it with a few products.
  • Keep Communication Open: Send automated order status updates to customers for better trust.

Case Study Example

Imagine a small embroidery shop in Delhi selling personalized T-shirts. Initially, all orders came through WhatsApp and had to be entered manually into a logbook. Customers often faced delays, and mistakes in name spellings were common.

After setting up a Shopify store with an embroidery integration app, orders flowed directly into their digitizing software. Designs were auto-processed and sent to their 4-head embroidery machine. Turnaround time dropped from 5 days to 2 days, and sales doubled within 6 months.

The Future of Embroidery + E-Commerce

Looking ahead, AI will play a massive role in embroidery integration. AI-powered digitizing can instantly convert customer-uploaded logos into stitch-ready files. Machine learning will help predict which designs sell best, while cloud-based systems will allow embroidery businesses to operate entirely online.

Zardozi Embroidery

The golden age of Zardozi embroidery in India began during the Mughal period.

  • It was introduced to India by Persian craftsmen who came with the Mughal emperors.
  • Emperor Akbar (1542–1605) played a key role in promoting and perfecting the art.
  • Zardozi was extensively used in:
    • Royal garments for kings, queens, and courtiers
    • Canopies and wall hangings for palaces
    • Decorated tents and scabbards (sword covers)
    • Ceremonial costumes and accessories

During this time, Zardozi became not just a craft but a symbol of status and luxury. Every stitch reflected the power, wealth, and artistic sensibility of the Mughal courts.

Decline After the Mughals

The decline of the Mughal Empire in the 18th century had a direct impact on Zardozi.

  • Without royal patronage, artisans lost their main source of livelihood.
  • The use of real gold and silver threads became unsustainable due to rising costs.
  • With the arrival of British colonial rule and industrialization, machine-made fabrics and cheaper alternatives became popular.
  • Many skilled Zardozi artisans were forced to give up their craft and turn to other professions, leading to a significant loss of heritage.

Revival of Zardozi in Modern India

Fortunately, Zardozi did not disappear completely. In the 20th century, revival efforts began:

  • The government and handicraft organizations recognized its cultural importance and supported artisans.
  • Instead of pure gold and silver, gilt wires (copper coated with gold or silver polish) were introduced to make Zardozi more affordable and accessible.
  • Today, Zardozi thrives in several parts of India, especially in:
    • Lucknow (Uttar Pradesh) – famous for its detailed Zardozi bridal wear
    • Hyderabad (Telangana) – known for royal-style patterns
    • Agra, Delhi, and Bhopal – other centers preserving the craft

Techniques and Materials Used in Zardozi

Traditional Zardozi is a labor-intensive craft. The process involves:

  1. Base Fabric – Rich fabrics like silk, velvet, or satin are used as the canvas.
  2. Frame (Adda) – The fabric is stretched tightly on a wooden frame to provide stability.
  3. Metallic Threads – Earlier pure gold and silver, now replaced with polished copper or synthetic metallic threads.
  4. Stitches and Work – Artisans use needles to attach wires, sequins, beads, pearls, and even semi-precious stones.
  5. Design Motifs – Inspired by nature (flowers, leaves, peacocks, vines), Mughal architecture (arches, domes), and geometric patterns.

The result is a three-dimensional raised effect, giving the embroidery a rich and opulent look.

Zardozi in Modern Fashion

Today, Zardozi continues to hold its place in both traditional and contemporary fashion:

  • Bridal Wear – Lehenga cholis, sarees, sherwanis heavily embellished with Zardozi are staples in Indian weddings.
  • Accessories – Handbags, clutches, shoes, and belts often feature Zardozi embroidery.
  • Home Décor – Cushion covers, wall panels, and curtains use Zardozi to add a regal touch.
  • Couture Fashion – Many Indian and international designers incorporate Zardozi in their collections for its timeless elegance.

The craft has transformed from being exclusive to royalty into something accessible yet still luxurious, keeping its cultural legacy alive.

Cultural Significance

Zardozi is more than just embroidery — it represents:

  • Heritage – A direct link to India’s Mughal past.
  • Artistry – A reflection of patience, skill, and creativity passed down through generations.
  • Identity – Recognition as a Geographical Indication (GI) craft in regions like Lucknow, helping artisans protect their traditional knowledge.

Seasonal Embroidery Business Ideas: Festive & Wedding Seasons in India

Introduction

India is a land of celebrations. From vibrant festivals to lavish weddings, there is always an occasion that calls for new clothes, gifts, and home décor. What makes these events even more special is embroidery—an art form that transforms plain fabrics into heirlooms of culture, beauty, and identity.

For embroidery businesses, the festive and wedding seasons represent golden opportunities. Unlike other markets that rely on one major shopping period in the year, India’s cultural calendar ensures multiple demand peaks. Families invest in embroidered outfits, bridal wear, accessories, and even personalized gifts, often spending more generously during these seasons.

This blog explores how embroidery entrepreneurs—whether home-based artisans or workshop owners—can tap into seasonal demand. We’ll look at festive embroidery ideas, wedding-specific opportunities, trending designs, and marketing strategies to help businesses thrive.

Why Seasonality Matters in the Embroidery Business

1. Multiple Demand Peaks

India celebrates major festivals like Diwali, Eid, Navratri, Durga Puja, Pongal, Onam, and Christmas, each with unique clothing traditions. In addition, wedding seasons arrive two to three times a year, based on auspicious dates. For embroidery businesses, this means steady waves of opportunity rather than a single peak.

2. Emotional Connection

Embroidery is not just decoration—it is cultural symbolism. A lotus or diya embroidered on a saree reflects prosperity during Diwali; a golden paisley on a bridal dupatta reflects tradition and wealth. Customers are willing to pay premium prices because embroidery carries emotional value.

3. Higher Margins

Compared to plain textiles, embroidered products command higher prices. A plain kurti may sell for ₹1,000, but add intricate embroidery and it becomes a ₹3,000 product. This margin makes seasonal embroidery especially profitable.

Festive Season Embroidery Business Ideas

Festivals are colorful, diverse, and deeply cultural. Here are ways embroidery businesses can align their products with festive demand.

1. Ethnic Wear Collections

Festive seasons often call for new sarees, lehengas, kurtis, and dupattas. Businesses can:

  • Create Diwali-themed motifs such as diyas, lotuses, and peacocks.
  • Offer Eid collections with intricate threadwork on abayas and salwar suits.
  • Design Durga Puja sarees with bold borders and festive reds.
  • Cater to Onam and Pongal with elegant embroidered kasavu sarees and dhotis.

2. Men’s Festive Wear

While women’s clothing dominates the embroidery market, men’s fashion is growing fast. Embroidered kurtas, nehru jackets, and sherwanis with subtle motifs are highly in demand during Diwali and Eid.

3. Accessories for Festivals

Accessories are small-ticket items but sell in large numbers. Ideas include:

  • Embroidered stoles and dupattas for gifting.
  • Handbags and clutches with festive motifs.
  • Belts, turbans, and scarves with subtle embroidery for men.

4. Home Décor Products

Festivals are also about decorating homes. Embroidered cushion covers, table runners, bed linens, and wall hangings make excellent products for seasonal catalogs. Many families prefer embroidered items as gifts for relatives and friends.

5. Corporate & Personalized Gifting

Businesses spend heavily on festive gifting. Offering embroidered hampers (bags, pouches, or apparel with logos) can bring bulk orders. Personalized monogram embroidery on towels, napkins, or gift sets also appeals to urban buyers.

Wedding Season Embroidery Business Ideas

If festivals are the fuel of embroidery, weddings are the fire. Indian weddings are grand, multi-day events where embroidery is not just preferred—it is essential.

1. Bridal Wear

Brides are the heart of the wedding market. Popular opportunities include:

  • Lehengas & sarees with zari, sequins, and stone embellishments.
  • Blouses and dupattas with ornate embroidery.
  • Custom motifs such as initials or symbolic designs (lotus, peacock, paisley).

2. Groom’s Outfits

Embroidery isn’t just for brides. Grooms spend heavily on:

  • Sherwanis with zari or resham threadwork.
  • Embroidered turbans and stoles.
  • Jackets with traditional motifs adapted to modern styles.

3. Group & Family Outfits

Families often order coordinated embroidery themes for bridesmaids, groomsmen, and close relatives. This trend creates bulk orders, increasing revenue for embroidery workshops.

4. Wedding Accessories

Accessories can be just as profitable as outfits. Some options:

  • Embroidered clutches, handbags, and juttis.
  • Wedding favors such as embroidered handkerchiefs or pouches.
  • Personalized monogrammed robes for the bride and groom.

5. Destination Weddings & Themes

Many couples today opt for destination weddings with themes. For example:

  • Beach weddings → floral or shell-inspired embroidery.
  • Palace weddings → heavy zari and Mughal-style motifs.
    This opens opportunities for creative customization.

Materials, Designs & Inspirations

To succeed in seasonal embroidery, businesses must select the right materials and styles.

  • Fabrics: Silk, velvet, georgette, chiffon, and organza are popular for weddings; cotton blends and light silks for festivals.
  • Threads & Embellishments: Zari, resham, sequins, pearls, and beads elevate embroidery into luxury.
  • Regional Styles: Adapting traditional techniques (Zardozi, Phulkari, Kantha, Chikankari, Kashmiri embroidery) with modern machines appeals to both local and global buyers.
  • Design Fusion: Blending traditional motifs with modern minimalism (e.g., geometric patterns with zari) caters to younger clients.

Marketing Strategies for Seasonal Success

Great embroidery is useless without visibility. Seasonal marketing is key.

1. Build an Online Presence

  • Showcase products on Instagram, Pinterest, and WhatsApp catalogs.
  • Create a website with seasonal collections and pricing.
  • Use keywords like “best bridal embroidery in Delhi” for local SEO.

2. Leverage Social Media Campaigns

  • Post festival countdowns with embroidery sneak peeks.
  • Share behind-the-scenes videos of your workshop.
  • Use trending hashtags (#DiwaliFashion, #IndianWeddingStyle).

3. Collaborate with Partners

  • Work with local boutiques, tailors, and wedding planners.
  • Provide sample pieces to fashion influencers.

4. Seasonal Offers & Pre-Booking

  • Announce limited edition collections with urgency.
  • Offer discounts for bulk family orders during wedding seasons.
  • Encourage pre-booking for festival outfits to manage demand.

5. Customer Engagement

  • Share customer testimonials and photos.
  • Create loyalty programs for repeat clients.
  • Offer referral discounts for bridesmaids/groomsmen group orders.

Scaling Beyond the Season

While festivals and weddings are peak times, smart embroidery businesses extend their revenue year-round by:

  • Launching evergreen collections of casual embroidered wear.
  • Diversifying into home décor and lifestyle embroidery.
  • Exploring export opportunities for traditional Indian embroidery.
  • Offering digitized design files for smaller businesses.

How to Create 3D Puff Embroidery Designs (Step-by-Step)

Elevate Your Embroidery Game with Stunning 3D Puff Effects

Welcome to the ultimate guide for crafting eye-catching 3D puff embroidery designs using your Julee Embroidery machines! This technique, popular for logos, apparel, and custom gifts in India, adds a bold, raised texture that stands out. Whether you’re a home-based entrepreneur or a scaling business, mastering 3D puff embroidery can set your work apart in 2025’s competitive market. Let’s dive into the step-by-step process, tailored for Indian fabrics and machine setups.

What You’ll Need

  • Embroidery Machine: A single or multi-head Julee machine with adjustable pressure and speed settings.
  • 3D Puff Foam: Pre-cut foam sheets (available from local suppliers in Surat or Delhi).
  • Thread: High-quality polyester or rayon thread in your chosen colors.
  • Stabilizer: Tear-away or cut-away stabilizer for fabric support.
  • Needles: Size 75/11 or 80/12 embroidery needles.
  • Hoop: Medium to large hoop (depending on design size).
  • Design Software: Any Julee-compatible digitizing software (e.g., Wilcom or Hatch).
  • Fabric: Cotton, blended kurtas, or sportswear materials common in India.

Step-by-Step Guide to 3D Puff Embroidery

Step 1: Prepare Your Design

  • Digitize with Care: Use your software to create or import a design. For 3D puff, focus on bold outlines and avoid intricate details—simple shapes like letters or logos work best.
  • Set Stitch Type: Use a satin stitch or zigzag stitch with a wide width (3-5 mm) to cover the foam. Adjust density to 0.4-0.6 mm for optimal puff effect.
  • Test the File: Run a test stitch on scrap fabric to ensure the design fits your foam size.

Step 2: Set Up Your Machine

  • Install the Needle and Thread: Load your machine with a fresh needle and thread matching your design.
  • Adjust Tension: Set the upper thread tension to 4-5 and lower tension to 2-3 to avoid pulling the foam.
  • Select Speed: Start at a moderate speed (600-700 SPM) to maintain control over the puff layer.

Step 3: Hoop the Fabric and Stabilizer

  • Layer Properly: Place the stabilizer under your fabric, then hoop both tightly without stretching the material.
  • Align the Design: Use the machine’s alignment tool to position your design accurately.

Step 4: Place the 3D Puff Foam

  • Cut to Size: Trim the foam to match the outline of your design, leaving a small border (1-2 mm).
  • Position Carefully: Lay the foam over the hooped fabric, aligning it with the design’s start point. Secure lightly with temporary adhesive if needed (avoid heavy glue).

Step 5: Stitch the Base Layer

  • Run the First Pass: Stitch the outline or a base layer to tack the foam in place. Use a running stitch or light satin stitch.
  • Check Alignment: Pause to ensure the foam hasn’t shifted. Adjust if necessary before proceeding.

Step 6: Add the Puff Layer

  • Stitch Over the Foam: Run the main satin stitch pass to encase the foam. Keep the machine steady to avoid uneven puffing.
  • Trim Excess: After stitching, carefully trim any foam sticking out with small scissors, staying close to the stitches.

Step 7: Finalize and Finish

  • Remove Stabilizer: Tear away or cut the stabilizer from the back, ensuring no residue remains.
  • Inspect the Design: Check for loose threads or uneven puff. Re-stitch small areas if needed.
  • Press Gently: Use a low-heat iron (with a pressing cloth) to set the design, avoiding direct heat on the foam.

Tips for Success

  • Fabric Compatibility: Test on scraps first—silk or delicate fabrics may need extra stabilizer to handle the puff weight.
  • Thread Breakage: Reduce speed if the thread snaps; check needle condition too.
  • Design Scale: Keep designs under 10×10 cm for best puff results on home machines.
  • Local Sourcing: Buy foam and threads from embroidery hubs like Tiruppur or Jaipur for cost savings.

Troubleshooting Common Issues

  • Flat Puff: Increase stitch density or use thicker foam.
  • Foam Shifting: Secure with adhesive or re-hoop tightly.
  • Thread Puckering: Lower machine tension and use a lighter stabilizer.

Why 3D Puff Rocks in 2025

This technique is trending for custom jerseys, wedding kurtas, and branded caps in India. With Julee’s multi-head machines, you can scale production for festivals like Diwali or Eid, tapping into the demand for textured, premium embroidery.

Ready to try it? Share your 3D puff creations on Instagram with #Julee3DPuff—let’s see your saap-tastic designs, bro! 😎🐍

🧵 What is a Computerized Embroidery Machine? A Beginner’s Guide

Embroidery has been part of our tradition for centuries. But with modern technology, embroidery is no longer limited to hand stitching — today we have computerized embroidery machines that make the process faster, more accurate, and more creative.

In this guide, we’ll cover everything beginners need to know about computerized embroidery machines.

✅ What is a Computerized Embroidery Machine?

A computerized embroidery machine is a modern sewing device that uses digital designs instead of manual stitching.

  • You can upload designs through a USB drive, memory card, or direct software.
  • Once the design is selected, the machine automatically stitches the pattern onto fabric.
  • No manual tracing or hand-stitching is required — the machine handles everything with precision.

⚙️ How Does It Work?

  1. Choose a design (from built-in designs or custom software).
  2. Load the fabric into the machine’s embroidery hoop.
  3. Start the machine – it automatically follows the design with thread and needle movement.
  4. Within minutes, you’ll get a professional-quality embroidery finish.

🌟 Key Features of Computerized Embroidery Machines

  • Pre-loaded Designs → Most machines come with hundreds of built-in patterns.
  • USB Connectivity → Import your own logos and custom artwork.
  • Multiple Stitches & Colors → Automatic color changes for complex designs.
  • Touchscreen Display → Easy navigation and design preview.
  • High Speed & Accuracy → Saves time and delivers perfect stitches.

🎨 Who Can Use It?

  • Small business owners (boutiques, tailor shops).
  • Fashion designers who want custom patterns.
  • Home-based entrepreneurs starting embroidery work.
  • Large-scale manufacturers for bulk production.

💡 Benefits of Using a Computerized Embroidery Machine

  • Time-Saving → Complete designs in minutes.
  • Professional Quality → Perfect stitches, no manual errors.
  • Customization → Create unique logos, names, or patterns.
  • Business Growth → Start your own embroidery business with low investment.

🚀 Final Thoughts

Computerized embroidery machines are the future of embroidery. Whether you’re running a small boutique, a tailoring unit, or planning to start an embroidery business, these machines can transform your work into professional art.

Regional Embroidery Styles in India & How Machines Are Revolutionizing Them

Introduction to Indian Embroidery Heritage

India has always been known as a land of textiles, colors, and intricate craft traditions. Among these, embroidery holds a special place. From ancient royal courts to rural households, embroidery has not only been a decorative art but also a form of storytelling, cultural expression, and identity. Each region of India has developed its own unique embroidery style, characterized by local materials, motifs, and techniques. Together, these styles form a vibrant tapestry of India’s rich cultural heritage.

But as times change, so does the way these crafts are practiced. While traditional hand embroidery remains unmatched in its delicacy and uniqueness, the demand for faster, scalable production has given rise to machine embroidery. Interestingly, embroidery machines are now being programmed to replicate regional Indian embroidery styles, bridging the gap between tradition and technology.

In this blog, we’ll explore some of the most iconic regional embroidery styles in India and how modern machines are adapting to preserve, scale, and innovate within these traditions.

Famous Regional Embroidery Styles of India

Phulkari (Punjab)

Phulkari, literally meaning “flower work,” originates from Punjab and has long been associated with celebrations, especially weddings. Traditionally, women would embroider Phulkari on handwoven fabrics like khaddar using silk threads in bright hues such as red, orange, and yellow.

  • Motifs & Stitches: Geometric floral patterns dominate Phulkari. The darning stitch is the most commonly used technique, worked on the wrong side of the cloth so the design appears on the right.
  • Cultural Significance: Phulkari is more than embroidery; it is a tradition passed down from mothers to daughters, symbolizing prosperity and love.

Today, machines can replicate Phulkari motifs using pre-programmed stitch patterns, making the designs accessible to global markets while still preserving their aesthetic charm.

Chikankari (Lucknow, Uttar Pradesh)

Delicate and elegant, Chikankari embroidery is one of India’s most refined forms of hand embroidery. Originating in Lucknow, it is believed to have been introduced by Mughal empress Nur Jahan in the 16th century.

  • Motifs & Stitches: Chikankari involves more than 30 types of stitches, including backstitch, chain stitch, and hemstitch. Floral patterns dominate, often worked with white thread on muslin or light fabrics.
  • Global Recognition: Chikankari garments are prized worldwide for their sophistication and understated beauty.

Modern machines now mimic Chikankari by using fine threads and digitized motifs. While machine work cannot replicate the same hand-drawn fluidity, it provides affordable and quicker alternatives for fashion industries.

Kantha (West Bengal & Odisha)

Kantha is one of the oldest forms of Indian embroidery, traditionally practiced by rural women in West Bengal and Odisha. The craft involves upcycling old saris and dhotis, layering them, and stitching them together with simple running stitches.

  • Motifs & Stitches: Kantha uses a running stitch to create motifs of animals, flowers, folklore, and daily life. It has a storytelling quality, where each piece narrates a tale.
  • Eco-Friendly Tradition: Kantha embodies sustainability as it emerged from reusing discarded fabrics.

Digitized Kantha designs on machines replicate the running stitch, creating quilts, dupattas, and home décor items on a large scale without losing the rustic charm.

Zardozi (Mughal Influence, North India)

Zardozi is a regal embroidery form that uses metallic threads, sequins, and beads. Flourishing during the Mughal period, Zardozi adorned royal garments, tents, and even furnishings.

  • Motifs & Stitches: Dense embroidery of vines, flowers, and geometric shapes using gold and silver threads.
  • Applications: Bridal wear, sherwanis, and luxury home textiles.

Machines replicate Zardozi using metallic threads and bead attachments, enabling mass production of glamorous designs while retaining their opulent appeal.

Other Regional Styles

  • Kasuti (Karnataka): Geometric patterns inspired by temple architecture, stitched with counting techniques that resemble weaving.
  • Kutch & Mirror Work (Gujarat & Rajasthan): Vibrant threads and small mirrors stitched onto fabric, reflecting light and energy.
  • Toda Embroidery (Tamil Nadu): Red and black wool on white cloth, creating bold geometric patterns.
  • Aari Work (Jammu & Kashmir): Hook-based chain stitches producing fine, flowing floral patterns.

Each of these regional embroidery styles has distinct features that are now being carefully digitized for machine embroidery.

Challenges of Preserving Traditional Embroidery

Despite its beauty, traditional embroidery faces several challenges:

  1. Decline of Hand Artisans: Younger generations often prefer modern careers, leading to fewer skilled artisans.
  2. High Labor Costs: Hand embroidery is time-intensive, making it expensive compared to machine-made alternatives.
  3. Risk of Losing Authenticity: With mass production, the originality and soul of handcrafted embroidery are at risk.

These challenges necessitate a balance between tradition and technology, where machines help sustain demand while artisans continue to innovate.

How Modern Machines Adapt to Traditional Styles

The evolution of embroidery machines has transformed how regional embroidery styles are reproduced. Here’s how:

  • Computerized Embroidery Machines: Modern machines use digitized designs where traditional motifs are scanned and programmed for precise replication.
  • Stitch Variety: Advanced machines can replicate darning stitches (for Phulkari), running stitches (for Kantha), and chain stitches (for Chikankari) with near accuracy.
  • Motif Digitization: Old handmade designs are preserved digitally, ensuring motifs are not lost over generations.
  • Faster Production: What once took weeks by hand can now be produced in hours, meeting global fashion demands.
  • Hybrid Approach: Many designers blend machine and hand embroidery—machines do the base, while artisans finish with hand detailing.

This collaboration between tradition and technology ensures that embroidery remains relevant in contemporary markets.

Future of Indian Embroidery with Technology

The future of embroidery in India lies in a fusion of heritage and innovation:

  • AI-Driven Design Customization: Artificial intelligence can predict consumer preferences and create embroidery motifs tailored for trends.
  • Sustainable Fabrics: Machine embroidery on organic fabrics supports eco-friendly fashion.
  • Empowering Artisans: Digital platforms allow artisans to collaborate with tech-driven embroidery businesses, expanding their reach.
  • Global Recognition: With machines standardizing embroidery patterns, Indian motifs gain more visibility on the international stage.

The future doesn’t replace artisans; instead, it provides them with tools to amplify their skills and markets.

Tips for Reducing Thread Breakage in Embroidery Machines

Few things slow down embroidery production more than thread breakage. Whether you’re working on school uniforms, bridal wear, or custom caps, every broken thread means wasted time, frustrated operators, and delayed deliveries.

The good news? Most thread problems come from fixable issues like tension, needles, or design setup. In this guide, we’ll explore practical tips to reduce thread breakage in embroidery machines, keep your production smooth, and ensure higher-quality embroidery results.

Common Causes of Thread Breakage

Before solving the problem, it’s important to know why it happens:

  • Low-quality or old thread → brittle, frays easily, and breaks under tension.
  • Incorrect threading → missed guides or twisted paths lead to uneven stress.
  • Needle issues → bent, dull, or wrong-sized needles cut the thread.
  • Tension problems → too tight or too loose settings strain the thread.
  • Poor maintenance → dust, lint, or burrs in the needle plate snag the thread.

Identifying the cause helps you apply the right fix.

Tips to Reduce Thread Breakage

✅ 1. Choose the Right Thread & Needle

  • Use polyester thread for durability and strength; rayon works best for a glossy finish but breaks easier.
  • Match needle size to thread thickness (e.g., 75/11 for standard thread, 80/12 for thicker thread).
  • Replace old or sun-damaged thread spools — they weaken over time.

✅ 2. Maintain Correct Thread Tension

  • If tension is too tight, the thread snaps quickly.
  • If tension is too loose, loops form, causing snags and breaks.
  • Test tension before bulk runs using a small sample on similar fabric.

👉 Tip: Adjust one knob at a time and track the results to avoid confusion.

✅ 3. Regular Machine Maintenance

  • Clean lint, dust, and stray fibers daily, especially near the bobbin case and thread path.
  • Oil moving parts according to the manufacturer’s guide.
  • Check needle plates and presser foot for scratches or burrs — smooth them out with fine sandpaper if needed.

✅ 4. Optimize Digitized Designs

  • Avoid overly dense stitch areas that strain the thread.
  • Use proper underlay stitching for support.
  • Reduce unnecessary thread trims to prevent excess tension changes.

If you’re outsourcing digitizing, ask for embroidery-optimized files to minimize thread breaks.

✅ 5. Control Machine Speed

  • High-speed embroidery may look efficient, but it increases stress on threads.
  • For delicate fabrics like silk or chiffon, slow down to 600–700 stitches per minute.
  • For uniforms or cotton, you can safely go faster (800–900 spm).

✅ 6. Store Threads Properly

  • Keep threads away from direct sunlight — UV light weakens fibers.
  • Store in airtight boxes or racks to protect from dust and moisture.
  • Avoid stacking spools too tightly, as pressure can deform thread cones.

Advanced Troubleshooting (When Problems Persist)

If thread breaks continue even after applying the tips above:

  • Check needle plate and presser foot alignment — even slight misalignments cause snagging.
  • Inspect the hook and bobbin case for wear. Replace if damaged.
  • Refer to your machine’s manual for recommended parts and settings.
  • Contact your supplier or technician for professional servicing.

Pro Tips from Industry Experts

  • Keep spare needles and threads on hand for quick replacements.
  • Train staff to recognize tension problems early before full breakdowns happen.
  • Maintain a troubleshooting logbook to track recurring problems and identify machine-specific issues.

Embroidery Machine Safety Tips for Operators

1. Wear the Right Safety Gear

Personal protective equipment (PPE) plays a major role in embroidery safety. Operators should:

  • Avoid loose clothing, jewelry, or accessories that could get caught in moving parts.
  • Wear safety glasses to protect eyes from broken needles or flying debris.
  • Use gloves only when handling heavy fabric rolls or frames—not while operating the machine.

2. Keep Hands and Fingers Clear

The embroidery needle operates at high speed. Always:

  • Avoid placing hands near the needle area while the machine is running.
  • Use proper tools (like tweezers or clamps) to remove thread jams.
  • Wait until the machine has fully stopped before making adjustments.

3. Follow Proper Training and Procedures

Machine safety begins with knowledge. Operators should:

  • Receive formal training before working with embroidery machines.
  • Understand how to thread, operate, and shut down the equipment.
  • Learn how to handle emergency stop buttons and other safety features.

4. Maintain a Clean and Organized Workspace

A cluttered environment increases risks. To stay safe:

  • Keep cords, fabric, and tools away from moving machine parts.
  • Clean lint and dust regularly to avoid overheating.
  • Store scissors, needles, and other sharp tools in proper containers.

5. Perform Regular Machine Maintenance

Well-maintained embroidery machines are safer and more reliable. Operators should:

  • Check needles for bends, cracks, or wear before starting.
  • Lubricate moving parts as recommended by the manufacturer.
  • Report unusual noises, vibrations, or malfunctions immediately.

6. Use Safety Features Correctly

Modern embroidery machines include built-in safety mechanisms. Operators should:

  • Always engage the machine guard before starting.
  • Familiarize themselves with the emergency stop switch.
  • Double-check machine settings before pressing start.

7. Stay Alert and Avoid Distractions

Embroidery machines require full attention. To stay safe:

  • Never operate the machine while tired or under the influence.
  • Avoid phone usage and other distractions while stitching.
  • Supervise machines during operation to prevent accidents.

Embroidery Business Success Stories in India

Embroidery in India is more than an art—it’s an identity woven into the fabric of the country’s heritage. Across states like Gujarat, Rajasthan, Kashmir, and Karnataka, embroidery traditions have not only survived but also created opportunities for entrepreneurship, women’s empowerment, and global recognition. In recent decades, many artisans and entrepreneurs have transformed this craft into thriving businesses.

This article explores some of the most inspiring embroidery business success stories in India and the lessons they hold.

🌟 1. Razia Sultan – Crewel Embroidery Entrepreneur (Kupwara, J&K)

  • Background: Born in Trehgam, Kupwara, Razia Sultan received training under the Karkhandar scheme, a government initiative aimed at skill development.
  • Journey: With determination, she set up her own unit for crewel embroidery and chain stitch, both unique to Kashmir.
  • Impact:
    • Earns ₹60,000–70,000 monthly.
    • Trained 200+ women artisans in her region.
    • Established herself as a role model for local girls who now see embroidery as a path to financial independence.
  • Lesson: Government-backed training combined with entrepreneurship can spark local employment opportunities in rural India.

🌟 2. Pabiben Rabari – Inventor of Hari Jari & Founder of Pabi Bag (Kutch, Gujarat)

  • Background: Coming from the Rabari community in Kutch, Pabiben innovated her own embroidery style called Hari Jari.
  • Journey: With the help of the social enterprise Kaarigar Clinic, she launched the globally recognized Pabi Bag brand.
  • Impact:
    • Employs over 300 artisans.
    • Featured on Shark Tank India, securing ₹50 lakh investment.
    • Annual sales of ₹36 lakh with a 35% profit margin.
    • Products are sold internationally via pabiben.com.
  • Lesson: Blending traditional craft with modern branding and global retail networks can turn local artisans into international entrepreneurs.

🌟 3. Sakeela – Custom Saree Embroidery Entrepreneur (Andhra Pradesh)

  • Background: Inspired by her mother’s tailoring work, Sakeela built her own embroidery business.
  • Journey: Initially started small, but expanded with support from Mahila Money loans and the use of social media marketing.
  • Impact:
    • Handles 20–30 online orders daily.
    • Profits rose from ₹1.18 lakh/month to ₹2 lakh/month.
    • Creates personalized sarees with intricate embroidery.
  • Lesson: Digital platforms and microfinance can empower women entrepreneurs to scale their embroidery ventures quickly.

🌟 4. Arati Hiremath – Reviving Kasuti Embroidery (Dharwad, Karnataka)

  • Background: Kasuti embroidery is a 1,300-year-old tradition from Karnataka. It was at risk of fading away.
  • Journey: Arati Hiremath launched Artikrafts, an enterprise dedicated to reviving Kasuti by training rural women.
  • Impact:
    • Trained 850 women artisans (200 still active).
    • Annual turnover of about ₹40 lakh.
    • Her Kasuti sarees are stocked by Fabindia and were even worn by Finance Minister Nirmala Sitharaman in Budget 2023.
  • Lesson: Heritage crafts can be revived and made profitable through community entrepreneurship and partnerships with retail chains.

🌟 5. Ruma Devi – Empowering 50,000 Women through Embroidery (Barmer, Rajasthan)

  • Background: From a small desert village in Barmer, Rajasthan, Ruma Devi started with one needle and thread.
  • Journey: She formed self-help groups and trained thousands of women in embroidery and handicrafts.
  • Impact:
    • Leads a network of 50,000+ rural women artisans.
    • Awarded the Nari Shakti Puraskar in 2018.
    • Promotes tribal crafts across India and internationally.
  • Lesson: Social entrepreneurship in embroidery can uplift entire communities, turning crafts into a sustainable livelihood model.

🌟 6. Lalita Vakil – Guardian of Chamba Rumal Embroidery (Himachal Pradesh)

  • Background: Chamba Rumal embroidery, a traditional Himachali art, was fading until Lalita Vakil championed its revival.
  • Journey: Through training programs, she taught hundreds of women, preserving this unique needlework.
  • Impact:
    • Honored with Padma Shri (2022) and Nari Shakti Puraskar (2018).
    • Internationally recognized for promoting cultural heritage.
  • Lesson: Recognition and preservation of endangered embroidery forms can bring pride, visibility, and opportunities to artisans.

🌟 7. Madhav Fashion – From One Machine to Market Leader (Surat, Gujarat)

  • Background: Founded in 2005 with a single embroidery machine.
  • Journey: Grew steadily into a large-scale manufacturer of embroidered fabrics, supplying to fashion brands and retailers.
  • Impact:
    • Recognized as one of India’s leading embroidery manufacturers.
    • Demonstrates how industrial-scale embroidery can coexist with traditional handcrafts.
  • Lesson: Scaling embroidery with technology can open new horizons in the textile industry.

🌍 Insights & Common Themes

  • Women Empowerment: Most success stories are led by women, turning embroidery into a source of financial independence.
  • Cultural Preservation: Heritage crafts like Kasuti, Chamba Rumal, and Hari Jari are being revived through entrepreneurship.
  • Digital Leverage: Social media, online stores, and platforms like Shark Tank have been crucial in scaling embroidery businesses.
  • Community Impact: Many entrepreneurs go beyond personal profit to uplift artisans, especially women in rural areas.
  • Global Recognition: From Paris Couture houses to Indian retail giants like Fabindia, the world is acknowledging India’s embroidery excellence.

📊 Summary Table

Entrepreneur / BrandRegionCraft / FocusImpact
Razia SultanKupwara, J&KCrewel & chain stitch₹60K–70K/month; 200 trained
Pabiben RabariKutch, GujaratHari Jari embroidery, Pabi Bag₹36 lakh sales; Shark Tank funding
SakeelaAndhra PradeshCustom saree embroidery₹2 lakh/month profit
Arati HiremathDharwad, KarnatakaKasuti embroidery₹40 lakh/year; Fabindia supplier
Ruma DeviRajasthanTraditional crafts50K+ artisans uplifted
Lalita VakilHimachal PradeshChamba Rumal embroideryPadma Shri, Nari Shakti
Madhav FashionSurat, GujaratIndustrial embroidery fabricsMarket leader since 2005

How to Digitize Embroidery Designs for Perfect Results

Embroidery digitizing has revolutionized the way designs are created and embroidered on garments, accessories, and home décor. Whether you’re a small business owner, a hobbyist, or someone working in the apparel industry, understanding the art of digitizing embroidery designs is essential for achieving perfect results.

In this guide, we’ll cover everything you need to know about embroidery digitizing, from the basics to advanced tips, ensuring that you can create flawless designs that stand out. By the end, you’ll have a complete step-by-step process, insider strategies, and SEO-friendly knowledge that will help you master embroidery digitizing like a pro.

What is Embroidery Digitizing?

Embroidery digitizing is the process of converting artwork (logos, graphics, or illustrations) into a digital embroidery file that embroidery machines can read. This file instructs the machine how to stitch the design — including stitch type, direction, density, and sequence.

Unlike simply scanning an image, embroidery digitizing requires a skilled combination of software expertise, design understanding, and fabric knowledge.

Why It Matters

  • Ensures professional, crisp, and long-lasting embroidered results.
  • Saves time and reduces thread wastage.
  • Makes designs scalable across different products.
  • Enhances the quality of your brand presentation.

Tools Needed for Digitizing Embroidery Designs

Before diving into the step-by-step process, let’s look at the tools you’ll need:

  1. Embroidery Digitizing Software
    • Examples: Dahao EM Cad, Wilcom, Hatch, Brother PE-Design, Embrilliance, Pulse, and Ink/Stitch.
    • Each software comes with unique features like stitch simulation, editing tools, and file conversion.
  2. Embroidery Machine
    • Popular brands: Julee, Brother, Janome, Bernina, Tajima, and Ricoma.
  3. Artwork or Logo
    • High-resolution files work best (PNG, SVG, AI, or EPS).
  4. Computer/Laptop
    • Ensure you have sufficient RAM and processing power for handling large design files.
  5. Fabric and Stabilizer Samples
    • Different fabrics (cotton, polyester, denim, silk, etc.) respond differently to stitching.

Step-by-Step Guide to Digitizing Embroidery Designs

1. Prepare Your Artwork

  • Always start with a clean, high-resolution image.
  • Simplify the design (avoid overly detailed graphics that may not stitch well).
  • Ensure contrast and clarity for accurate digitizing.

2. Import Design into Digitizing Software

  • Open your embroidery software.
  • Import the artwork in the correct file format (JPEG, PNG, SVG, etc.).

3. Choose the Right Stitch Types

Embroidery isn’t just about “drawing with thread.” You must select appropriate stitch types:

  • Satin Stitch – Ideal for text and borders.
  • Fill Stitch (Tatami Stitch) – Used for larger areas.
  • Running Stitch – Outlines and fine details.

4. Adjust Stitch Density and Direction

  • Proper density prevents fabric puckering or stiffness.
  • Changing stitch direction adds depth and texture.

5. Set Underlay Stitches

Underlay stitches act as a foundation and prevent shifting. Options include:

  • Edge run underlay
  • Zigzag underlay
  • Center walk underlay

6. Optimize for Fabric Type

  • Light fabrics need lower density and softer underlay.
  • Heavy fabrics like denim require higher density.
  • Stretch fabrics demand careful stabilization.

7. Sequence Your Design

  • Digitize in a logical order (background to foreground).
  • Minimize trims and jumps for efficiency.

8. Save and Export in Machine Format

  • Save the master file (editable).
  • Export to specific machine format (DST, PES, EXP, JEF, VP3, etc.).

9. Test Stitch Out

  • Always run a sample on similar fabric before final production.
  • Adjust density, pull compensation, or thread colors as needed.

Common Mistakes to Avoid

  • Using low-resolution artwork → results in poor stitch quality.
  • Overly dense stitches → causes thread breakage and puckering.
  • Ignoring fabric type → design may not sit properly on certain materials.
  • Not testing the design → costly mistakes in production.
  • Skipping underlay stitches → reduces durability and neatness.

Advanced Tips for Perfect Embroidery Digitizing

  1. Use Auto-Digitizing Carefully
    • Many software programs offer auto-digitizing, but manual adjustments always yield better results.
  2. Apply Pull Compensation
    • Compensate for fabric stretch by slightly extending stitch lengths.
  3. Color Matching
    • Use the correct thread shade for brand consistency.
  4. Keep File Sizes Optimized
    • Large, overly complex files can slow machines down.
  5. Layer Wisely
    • Stitch larger filled areas first, then move to fine details.

Best Practices for Professional Results

  • Always maintain a balance between stitch density and design clarity.
  • Create different versions of the same design for different fabric types.
  • Keep learning! Join digitizing communities, forums, and embroidery groups.
  • Stay updated with software upgrades and industry trends.

SEO Keywords to Use Naturally

To make this blog SEO-friendly and rank organically, here are relevant keywords (use them naturally, not forced):

  • Embroidery digitizing
  • Digitizing embroidery designs
  • How to digitize embroidery
  • Best embroidery digitizing software
  • Embroidery machine file formats
  • Digitizing for embroidery step by step
  • Professional embroidery tips
  • Embroidery design conversion
  • Embroidery digitizing services

FAQs About Embroidery Digitizing

1. Can I digitize embroidery designs without software?
No, you’ll need digitizing software to create embroidery-ready files.

2. What file formats are used in embroidery machines?
Common formats include DST, PES, EXP, JEF, VP3, and HUS.

3. How long does it take to digitize a design?
Simple logos may take 20–30 minutes, while complex artwork can take several hours.

4. Is auto-digitizing good enough?
It works for basic designs, but professional results require manual digitizing.

5. Do I need professional digitizing services?
If you’re new or working with bulk orders, outsourcing to a professional digitizer may save time and reduce errors.